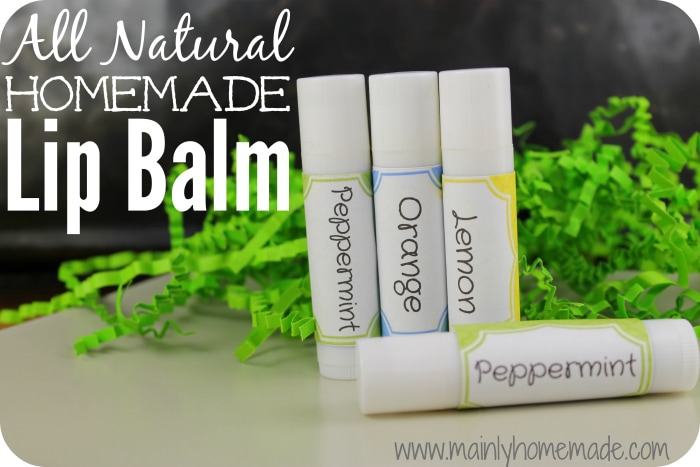
Do you hate having dry, cracked lips in the winter? This all natural homemade lip balm will help sooth dry cracked lips. I love how soft and smooth my lips feel after applying this lip balm. This stuff is the balm! With only three ingredients, this takes no time to make. Using dietary essential oils, you can safely make everyone’s favorite flavor. Safe for kids, since all of the ingredients are natural and can be consumed.
Homemade Lip Balm
Ingredients for Homemade Lip Balm
3 TablespoonsCoconut Oil (I recommend this natural, affiliate link)
1 Tablespoon Beeswax (I recommend this all natural, affiliate link)
20 Drops Essential Oils (These are the dietary essential oils I highly recommend)
Materials Needed for Homemade Lip Balm
10 tubes for lip balm (I recommend these tubes, affiliate link)
Wash and clean your lip balm tubes. Make sure they are completely dry before using them.
8oz Mason jar (for melting)
Pot of Water (for melting)
Pipette
Direction How to Make Homemade Lip Balm
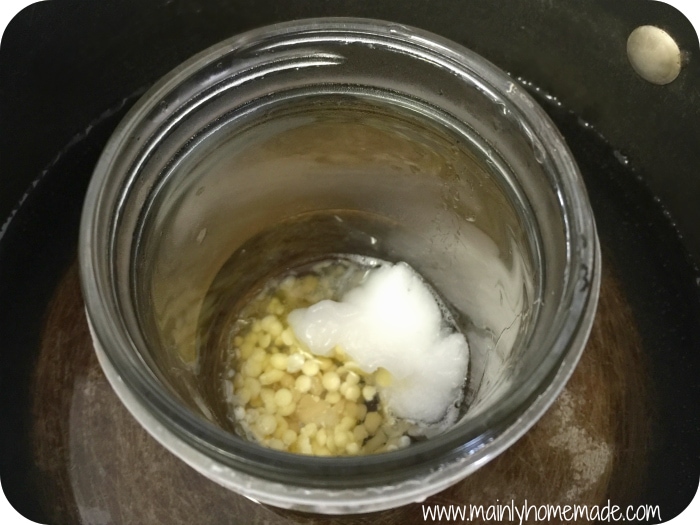
1. Start with a double boiler or I just use a mason jar in a hot pot of water. Melt the beeswax and coconut oil in the jar.
2. While the ingredients are melting, get all the tubes ready for the the melted concoction. Place two drops of your favorite essential oil in each tube. I made orange, lemon, lime and peppermint. These are the only oils I recommend to be used around the mouth area. They are safe for dietary consumption.
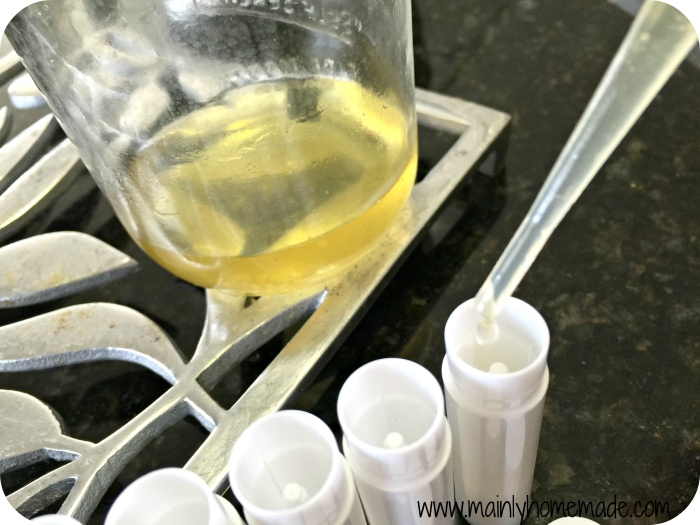
3. With a pipette, or anything you can use to safely pour melted ingredients, fill the tubes nearly to the top. It starts to solidify quickly once in the tubes. So work quickly. Adding the essential oils first, allows them to mix thoroughly with the melted oil and wax. It is ok to mix the oil in with the melted liquid, if you are making a big batch of all one flavor. Use about 20 drops for this size batch. I wanted to make several flavors, so this method works perfect.
4. Allow the liquid to cool for several hours before first use. I printed some cute little labels for each of the tubes to give to friends and my kids.
These make excellent gifts or include two or three for a gift set. I love to make a batch of these and have on hand whenever I need a quick gift. Pair them with some homemade whipped body butter and therapeutic bath salts for an excellent gift idea. My kids just love they can have their favorite flavor or several flavors. This homemade lip balm cost just pennies to make. Once the tubes are all used up, wash in really hot soapy water to sterilize them. They can be used over and over again.

All Natural Homemade Lip Balm for Dry Lips
Ingredients
- 3 TablespoonsCoconut Oil I recommend this natural, affiliate link
- 1 Tablespoon Beeswax I recommend this all natural, affiliate link
- 20 Drops Essential Oils These are the dietary essential oils I highly recommend
- Materials Needed for Homemade Lip Balm
- 10 tubes for lip balm I recommend these tubes, affiliate link
- Wash and clean your lip balm tubes. Make sure they are completely dry before using them.
- 8 oz Mason jar for melting
- Pot of Water for melting
- Pipette
Instructions
-
Start with a double boiler or I just use a mason jar in a hot pot of water. Melt the beeswax and coconut oil in the jar.
-
While the ingredients are melting, get all the tubes ready for the the melted concoction. Place two drops of your favorite essential oil in each tube. I made orange, lemon, lime and peppermint. These are the only oils I recommend to be used around the mouth area. They are safe for dietary consumption.
-
With a pipette, or anything you can use to safely pour melted ingredients, fill the tubes nearly to the top. It starts to solidify quickly once in the tubes. So work quickly. Adding the essential oils first, allows them to mix thoroughly with the melted oil and wax. It is ok to mix the oil in with the melted liquid, if you are making a big batch of all one flavor. Use about 20 drops for this size batch. I wanted to make several flavors, so this method works perfect.
-
Allow the liquid to cool for several hours before first use. I printed some cute little labels for each of the tubes to give to friends and my kids.
Want the printable I used to make these? Download the Lip Balm Printable here.
What is your favorite flavor for lip balm?

Leave a Reply