Make the homemade vapor rub your mom used to use on you as a kid using all natural ingredients.
This stuff worked well for coughs during the night. I really enjoyed using it, but did not like rubbing petroleum products on my skin.
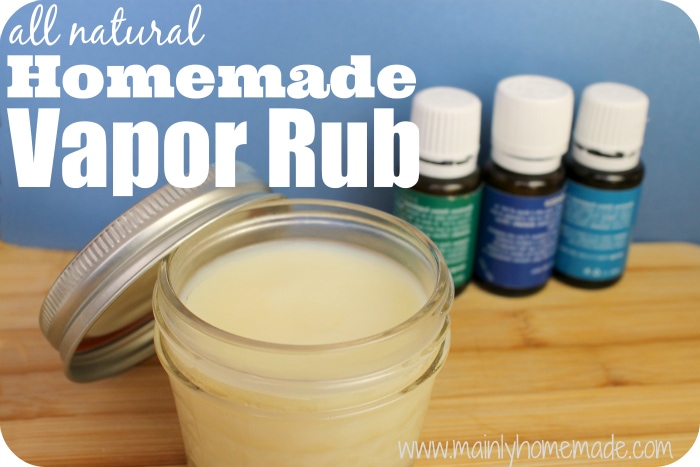
Searching for a great all natural vapor rub, I found the key chemical components of the over the counter stuff that make it work. Then I formulated my own essential oil blend where these key ingredients occur naturally in essential oils. I feel more at ease knowing all of the ingredients in this vapor rub are safe for me and my family. This is probably the closest to the real thing.
Homemade Vapor Rub
 (affiliate links have been used through out this post. I may make a few pennies if you purchase from this link)
Ingredients for Homemade Vapor Rub
5 Tablespoons Coconut Oil (affiliate link)
3 Tablespoons Cocoa Butter (affiliate link)
1 Tablespoon Beeswax (affiliate link)
30 drops Eucalyptus Globulus Essential Oil (I highly recommend these essential oils)
30 drops Rosemary Essential Oil (I highly recommend these essential oils)
15 drops Peppermint Essential Oil (I highly recommend these essential oils)
4oz Mason Jar (I highly recommend these. affiliate link)
*This is only a topical salve and should never be ingested.
Directions on How to Make Homemade Vapor Rub

1. It is best to make this homemade vapor rub right in the jar. Less mess to clean up. Start with a clean and sterile small 4oz mason jar to store the vapor rub. Just wash in the dishwasher to sanitize the jar. Mason jars are great, since the glass is made for high temperatures. Do use any other glass unless it says safe for baking. Place the mason jar in large pot with at least and inch of water or more, but do not go over the top of the jar. Drop one pellet of beeswax in the jar.

2. Once the one pellet of beeswax melts, the jar is now warm enough to start melting the other ingredients. At first, place the tablespoon of beeswax in the jar and melt it first. Then add the cocoa butter, and lastly add the coconut oil.

Gently stir to combine all the oils. Once all the oils are melted, remove from the water and let rest for five minutes. I started with the coconut oil first, but I think it would melt better with the beeswax first.

3. Letting it rest for five minutes, allows the rub to cool to add the essential oils. If too hot, the oils loose some of their potency. Add the Eucalyptus Globulus, Rosemary and Peppermint essential oils to the jar. Allow to cool completely before applying.
Be sure to test a small area first to see if you have any reactions to the oils. If you do, DO NOT USE THESE.
How to Best Use Homemade Vapor Rub
I like to use this all natural homemade vapor rub on the bottom of my sons feet and on his chest for additional respiratory support during the night. This helps him rest a little better. I use this homemade vapor rub on the bottom of my feet when I need more respiratory support. I have a bottle filled with this exact oil combination to diffuse. In case we all need more respiratory support, especially during these cold winter months. If you make and use this please tag me on all social media @mainlyHomemade or use the hashtag #mainlyhomemade so I can see what you are up to.

*These statements have not been evaluated by the Food and Drug Administration. These products are not intended to diagnose, treat, cure, or prevent any disease.
*Affiliate links have been used throughout this post so you can get this awesome product delivered right to your door! These are from the same people I order from and I have had no issues.

Thanks so much for sharing this awesome recipe.
Hi Amy. This is a fabulous recipe! I agree with you – putting petroleum anything on my skin is not cool. Pinning this!! Thanks for sharing. 🙂
This is awesome! I love finding natural replacements for old favorites!
This looks great! I almost have all the ingredients too!
You should like up at our Bloggers Spotlight party too. Everything gets pinned to the group board and there are two separate link ups, the post link-up and one for pins .