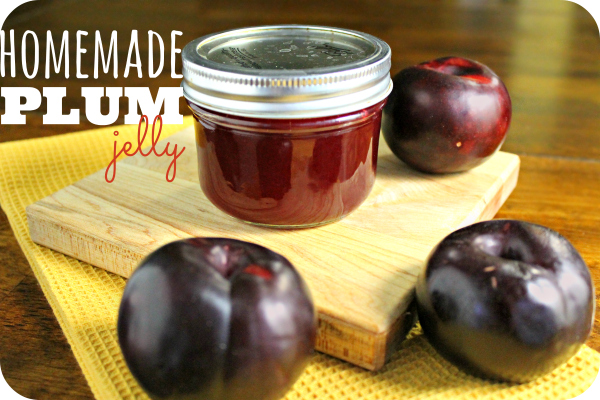
Thanks to Market Street for sponsoring how to make homemade plum jelly recipe post. All thoughts, opinions and photos are mine.
Growing up I never had store bought plum jelly.
My mom always made fresh plum jelly.
We had a plum tree and dewberry bushes growing on our property.
My mom would take the plums and the berries and juice them to make fresh jelly. Smelling jelly cooking in the kitchen reminds me of my mom and childhood. It is funny how a smell can bring back such powerful memories. I never had the chance for my mom to teach me how to make homemade jelly, but I always remember watching her make jelly in the kitchen. With Sugar Tree Plums from Market Street I am able to make jelly just like mama used to make.
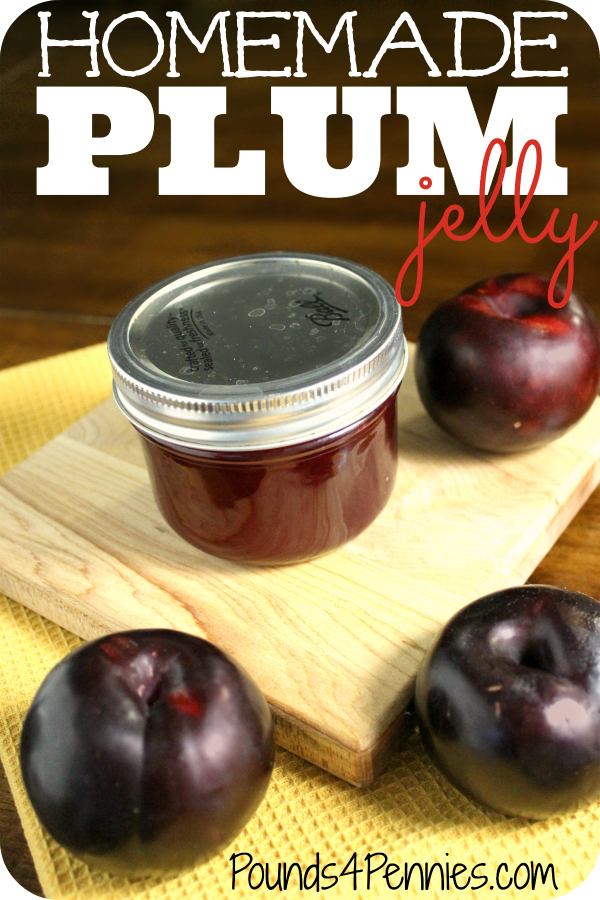
How to Make Homemade Plum Jelly Recipe
Ingredients for Homemade Plum Jelly Recipe
4 Cups Sugar
4-5 pounds of Sugar Tree Plums found at Market Street
4 1/2 Tablespoons of Pectin
Jelly jars (hot and sanitized) with lids and rings Just like these
Direction on How to Make Homemade Plum Jelly Recipe
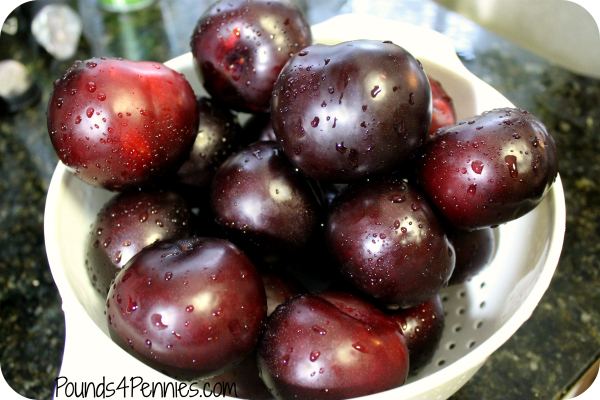
1. First wash the Sugar Tree Plums really well in a colander like this one.
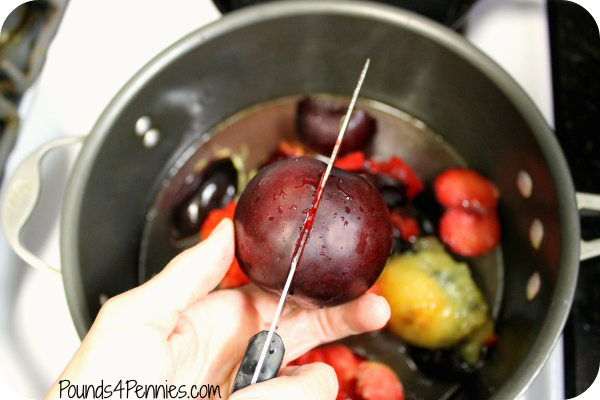
2. Next cut the plums in half around the pit and place in a large sauce pan, like this one, over medium high heat. Be sure to wear old clothes, since Sugar Tree Plums are very juicy and will spill on you. Place all the plums in the pan with the skins and pits to cook. No extra water is needed, since there is enough juice in these plums you will get plenty.
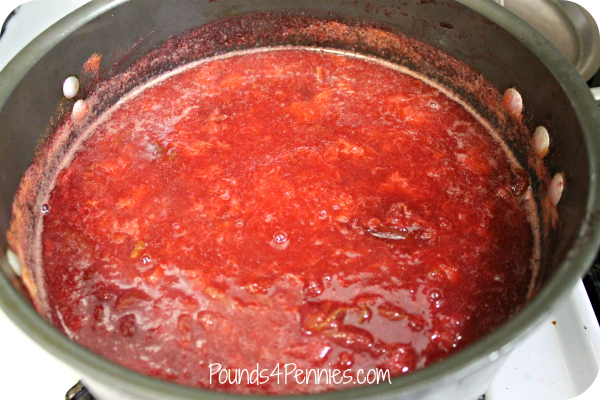
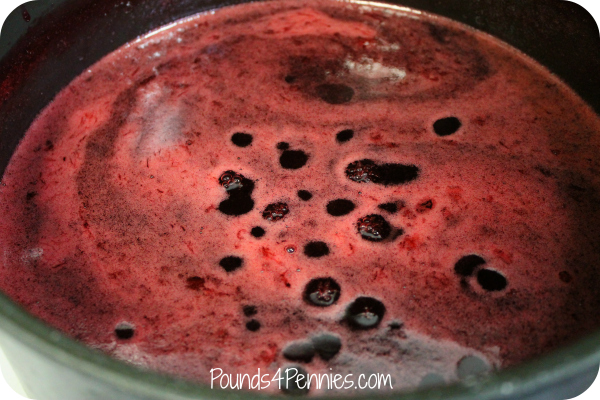
3. Once the plums start to boil turn down the heat to medium low and cover with a lid. Let this simmer for about an hour. Stirring every 10 -15 mins. You will notice the plums start to break down more and more as the plums cook. It starts to look like thick plum soup.
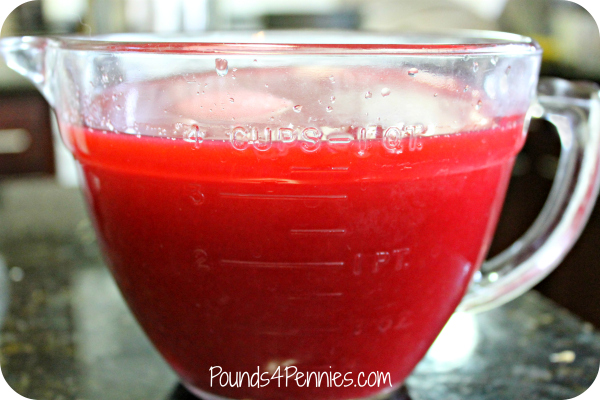
4. After the plums have been cooking for about an hour, strain them in a colander and save the juice in a large bowl similar to this one. If you have a jelly bag you can use that. I don’t have one yet, but I really want one to make jelly. So I just make do instead. After this first batch is strained. Strain again through cheesecloth or a fine mesh strainer to remove all the pulp until you have four cups of juice like the picture above.
5. Now that there is just plum juice, place back in the pan and heat again over medium heat and add the pectin and keep stirring. Use the pectin according to the package directions. Mine said 4 1/2 tablespoons to 4 cups juice. Allow all of the ingredients to come to a full rolling boil, then slowly add the sugar. Keep on stirring the plum juice the whole time or it will burn. Allow of all it to come back to a full boil that cannot be stirred down. Keep in stirring, just keep stirring. This takes a little time and muscle.
6. After the sugar is added and the boil cannot be stirred down allow to cook for one full minute at full boil stirring constantly.

7. Have the jars ready to go for the jelly. Take the juice off the heat and using a small cup pour into the hot jelly jars. It is important the jars are hot, since hot liquid is being poured into them. Fill to the bottom line of the jar. Wipe off the tops of the jars and place lids on the top. Next screw on rings, but not too tight just enough to seal.
Tip: to sanitize the jelly jars boil for 20 minutes with lids and rings. Keep hot until the jelly is ready to be poured in.
8. Place all the jars in the boiling water for about 20 minutes. Take out of the boiling water and place on the counter to cool and the lids will seal. You will hear a popping sound as they seal. You can also see the lids are sucked in and you cannot press the top down. If they don’t seal, that is the jar you eat first.
If you like this recipe, please consider rating it with the star rating system and leaving a comment below. I love hearing from you and seeing what recipes you make! Find me on Instagram and tag me @mainlyhomemade and #mainlyhomemade, or you can also find me on Facebook, and Pinterest. Thanks for helping me spread the word about homemade delicious food!
How to Make Homemade Jelly : Plum Jelly Recipe
Learn how to make homemade plum jelly like a pro with tips and tricks to making perfect homemade jelly every time. Plus easy canning tips for thick plum jelly. Reminds me when we had a plum tree and make homemade plum jelly every summer with my mom.
Ingredients
- 4 Cups Sugar
- 4-5 pounds of Sugar Tree Plums found at Market Street
- 4 1/2 Tablespoons of Pectin
- Jelly jars hot and sanatized with lids and rings
Instructions
-
First wash the Sugar Tree Plums really well in a colander.
-
Next cut the plums in half around the pit and place in a large sauce pan over medium high heat. Be sure to wear old clothes, since Sugar Tree Plums are very juicy. Place all the plums in the pan with the skins and pits to cook. No extra water is needed, since there is enough juice in these plums.
-
Once the plums start to boil turn down the heat to medium low and cover with a lid. Let this simmer for about an hour. Stirring every 10 -15 mins. You will notice the plums start to break down more and more as they cook. It starts to look like plum soup.
-
After the plums have been cooking for about an hour, strain them in a colander and save the juice in a large bowl. If you have a jelly bag you can use that. I don't have one yet, but I really want one. So I just make do instead. After this first batch is strained. Strain again through cheesecloth or a fine mesh strainer to remove all the pulp. You should have about 4 cups.
-
Now that there is just plum juice, place back in the pan and heat again over medium heat and add the pectin and keep stirring. Allow to come to a full roiling boil, then slowly add the sugar. Keep on stirring this whole time or this will burn. Allow of all this to come back to a full boil that cannot be stirred down. Keep in stirring, just keep stirring.
-
After the sugar is added and the boil cannot be stirred down allow to cook for one full minute at full boil stirring constantly.
-
Have the jars ready for the jelly to go. Take the juice off the heat and using a small cup pour into the hot jelly jars. It is important the jars are hot, since hot liquid is being poured into them. Fill to the bottom line of the jar. Wipe off the tops of the jars and place lids on the top. Next screw on rings, but not too tight just enough to seal.
-
Place all the jars in the boiling water for about 20 minutes. Place on the counter to cool and the lids will seal. If they don't that is the jar you eat first.
Recipe Notes
to sanitize the jelly jars boil for 20 minutes with lids and rings. Keep hot until the jelly is ready to be poured in.
Sugar Tree Plums can be found at Market Street right now. These plums are sweet and very juicy. Great for homemade plum jelly, snack or picnics this time of year. Sugar Tree Plums are from Kingsburg Orchard and is a result of an exclusive breeding program. These gorgeous plums are not genetically modified. Plus Market Street also has supplies for canning these juicy plums.

Homemade jelly is the best jelly ever, i made one from strawberries and everyone at home loves it.
My husband loves plums and he would enjoy this…. I don’t find plums for a very good price here though… if I do, this is a tempting thing to do with them. 🙂
Amy, you’re the first link I’m visiting from A Dish of Daily Life. I love making jam and can’t wait to get my hands on some plums! Isn’t making jam fun, and it feels so good to see those jars lined up on the counter! Love your photos.
I love making homemade jelly. My sisters and I do it several times every summer. This looks like a great recipe.
So I’m terrified to try canning. I never really paid attention when my mother and grandmother did it… and now I’m afraid I’ll somehow give my family botulism. But your steps make it seem doable. Definitely pinning and will have to give this a try!
Hey Abigail. I was so nervous too at first about botulism and the dangers of canning and pressure canning. I joined a few Facebook groups and I observed and asked a lot of questions, as well as buying the Ball Book of Canning, and watching a lot of YouTube videos. Jellies and jams are SO easy and because they have a high acid content, they can be water bathed and don’t need to be pressure canned. That in itself is so fun. You just cook your jelly, pour it into jars, and drop into a pot of boiling water for 5 minutes, and then take it out and allow it to cool. So simple and SO worth it. Do some research by learning to water bath first, and then if you enjoy water bathing and making things like jellies, jams, and caramel, then you can move on to fruits, veggies, and even meats. Good luck sweetie. You can do it.
First time jelly making after watching my mother for years. It was easy to follow and made a great batch for Christmas gifts. Thanks from southern Ohio.
I am so glad it turned out. I watched my mother make jelly for years. It was only after she passed, that I started making it on my own. It did not turn out the first couple of times. It was a learning experience. I simply prayed for her to guide me and she did. So then I had to share for everyone else to make perfect jelly too!
I haven’t made plum jelly since my grown kids were little…..but bought some plums & going to resurrect the jelly….I am not too picky about how clear the jelly is so after I boil the plums I put them in a colander over a bowl & let them drain, pulp & all. Seems to me to make the jelly/jam tastier & I feel the plums go further. To me the pulp enhances the flavor & then I discard the leftover pits & skins.
How much juice should I be using? All my other jelly recipes tell me to measure out 2 cups or 3 1/4 cups of juice, making up the deficit, if any, with water or Apple juice.
I have already got the juice ready to go, but need to find another recipe.
You should have about 4 cups of juice as indicated with the picture above. I have updated the recipe to reflect the 4 cup measurement. I hope this helps!
Yes, we love plum jelly also, we have our own. But I seem to always have an issue with the jelly not setting as firm as other jellies that I do, do you have any advice on why? I follow the receipe to a tee. I do low sugar, so my receipe is 6 cups juice, 3 cups sugar and the pectin is 1 box with 1/4 cup sugar at the beginning with the first boil and then add the rest of the sugar and do the 2nd boil and then can . I steam my plums for the juice, seem to have lots of pulp, so I let the juice sit over night and then use juice the juice at the top. Hope you can help me with this issue. Jan
In order for the jelly to set, it needs that amount of sugar or sugar substitute to set correctly. Cooking is like a fun science experiment, if you alter the ingredients, then you will get a different result. For jelly the sugar is not only a preservative, but also to help it set firm.
I just made plum jelly frim your recipe. Fingers crossed I am successful. I can’t wait?
Oh I hope it turned out! Thanks for letting me know.
Hi Vicki here after you fill Al the jars up and tighten them where do we put the canned ones at do we put one in the fridge and the rest in pantries
Great question Vicki. You can just put them in the pantry once they are sealed. If the lid did not seal then use that one first and place in your fridge.
You need to boil the filled jars for 5 minutes to seal them. Then remove from water and listen for the pop sounds. Let them sit for 12-24 hours to cool. Remove the rings and check the seals. Any that aren’t sealed should be refrigerated. The sealed jars can go in the pantry. It is not safe to “open kettle” can. Some people will say you can put the hot jelly in the jars and just let them seal, and they will, but it’s not a safe practice. You must put them in a water bath or pressure canner.
I have a plum tree and couldnt eat/give them away fast enough. Then I found this recipe and this my second year in a row making jelly with it. I half the recipe (because I’m lazy) to make for a quicker prep and cooking process. And because of the tree I get different batches of doneness throughout the season. Currently on back order at my job haha. Thanks
Thanks Marc! Glad to hear this recipe is working for you. This is my moms recipe. I only started making jelly after she passed. I am kinda kicking myself I never made jelly with her. Oh I would help from time to time. But never really learned all the secrets like I share here. Glad you have a way to eat all those yummy plums all year!
I make lots of jellies, all as per my mother-in-laws recipes and tutoring, because there’s lots of different fruit trees on my property and I hate to see anything go to waste. Yes believe it, middle of Manitoba and lots of fruit trees! My favorite to date is 1/2 chokecherry 1/2 cranberry. I very rarely make plum jelly because they don’t come in nice every year, but this year … wow. I’m about to try your recipe for the first time. I know there’s pectin in the skin and why it should be included but why in gods name do I want the pits in there? I’d ask mother Mary but she has passed and although she still inspires she no longer can give advice or answers.
I use the whole plum and strain out all the juice, skins and pits. Just less work and I get the same results. I always go for easy.
All right lol. I’ve just cooked my second pot full of plums of at least 5. (juice quantities to be allocated at a later date … ). No need for an answer, the pits fit in there just fine. It smells great. I’ll make three batches of jelly and balance of the juice of that large transfer pot goes in the chest freezer along with the other large pot which contains the juice balance of the last choke/cran batch I made. ( I know it sounds like I have a lot of pots, …. I was lucky enough to inherit all my moms and mother-in laws pot … pots everywhere but I use most, often at the same time) I sometimes wish I had room for a second stove top.! I have another 5 hours of plum cooking today so I’ll make jelly tomorrow. I’ll let you know how it turns out.
Well, I’m done. Took two full days but, a little sweet a little tart, great results. I have a habit of tweaking recipes and I couldn’t help myself. Cooked 5 large pots of plums, but, since I had lots of strawberries I added 15 chopped jumbo strawberries per pot. No colander, straight to cheesecloth. Cheesecloth bags hanging all over the basement, lol. (reminded me of mother Marys’ basement this time of year) Since you don’t specify what kind of pectin you used I was torn between using your sugar/juice ratio and following the Certo instructions. Your recipe called for 1 to 1 whereas Certo asked for 8 cups sugar to 6 cups juice. I settled on 7 cups sugar for 6 cups juice extract. I was a little worried jelly wouldn’t set proper but I opened one this morning and it had set correctly and tasted great. My wife said it tasted as good as her moms and that’s a high bar to meet. I still use a wax seal on all my jars. I know, with the new lids, now it’s double sealed but if mother Mary never lost a batch in 72 years,(Mary died in December at 87 years of age and cooked, baked and made jelly until the fall before that December) why mess with a tried and true method that ain’t broke? The trick is to top the jars with the hot wax immediately after filling with hot jelly mixture. Very hot on very hot = perfect seal and never any mold, even 2 or 3 years after sitting in the cold storage room. Bottom line, the jelly tastes great. I thank you for your recipe.
You are so very welcome. Yes my mom did the same and topped all her jelly with hot wax. Since I seal my jars with a hot water bath, I do not use the wax. I am so glad your jelly turned out perfectly.
After using this jelly (recipe mentioned above) a few times I have come to the conclusion that one should not be liberal when spreading it. It’s very good but it’s very sweet. Even with the grilled cheese sandwich this morning too much was not good. With these particular plums perhaps a no sugar pectin would have been better? Many, many wild plums will be ready very soon, they won’t be as juicy or as sweet so I find myself hesitant as to how to proceed. Any suggestions? Is this the time to use the juice/sugar ratio I used with the tree plums? This time I would appreciate feedback. I thank you for your time in advance.
Please feel free to experiment with the recipe. I have used less sugar and the jelly turned out more like jam and did not gel. I don’t use sugar added pectin just regular pectin.
Just made my first batch but it looks like syrup. Can I reprocess?
I am not sure if that would work. Did you allow it time to cool completely? Have you tried to refrigerate it to see if it gels more?
I think it will still taste great. Use it over pancakes. My wife Debbie (now passed) did a lot of pressure canning. At one time she had over 150 qt’s of green beans. It’s been 5yrs now and the green beans other things she canned are still good.
I’m not sure why I only produced 5-8ounce jars, as I followed recipe verbatim. Very good though
Not sure why either, maybe you are in a dryer climate. As long as it is good that is all that matters.
We always add about a tablespoon of butter in it when we put the sugar in. It is supposed to help keep it from foaming. My family has done this for generations. Has any one else ever heard of this?
I have not, but this sounds like an excellent tip. Thank you for sharing!
How do you know if it sealed.. it mY be a silly question but this is my first attempt
Great question. The top of the lid will be sunken down after it has cooled. You can usually tell if you push on the top. If it doesn’t go down then it is sealed. If it is not sealed, eat that one first.
Hi
I love this recipe and have been using it for years.
Thank you for sharing it!
Question, this year I got through step 4 and put the juice in fridge before step 5.
Life got busy and although I wished I had thrown it in the freezer I didn’t.
I don’t particularly want to make my fam sick but how long can it safely last?
I tasted it and it tasted fine, very tart but I haven’t reached step 5.
Thanks for s y guidance you can offer.
😊
I am thrilled you love this recipe. Be sure to give it a rating of 5 stars.
I would say the juice should be fine under a week if it is covered in the fridge. I would definitely reheat it to a boil for a little longer before you can.
I’m trying this recipe for the first time, never have done any jelly before. I hope it turns out. But I’m curious could you do the same recipe with other fruits like peaches?
Yes you can. I am thrilled you are trying to make jelly. You can use any fruit as long as you get the juice.
Is the jelly thick when it’s ready to open the jar ?
Thanks for your question Judy. I am not quite sure what you are asking. But the jelly should be very thick after it is done. Once in the jar it will be very thick and easy to spread.
Can I use the same receipe for jam? Can I also cut the sugar in half without any problems?
I am wanting to make jam instead of jelly. Do you also have a jam receipe? I have made jam once but did not save that receipe. My question of the sugar was can I use less.
Thank you
Thanks for asking Yolanda. You can try this Strawberry Jam recipe https://www.mainlyhomemade.com/recipes/strawberry-jam-recipe/ Yes you can use less, but know that it will not set up the same. Feel free to play around with the recipe until you get it just like you like it.
Thanks Yolanda. If you cut the sugar in half you may have more of a syrup than a jelly or jam. Sugar helps it set and become firmer in order to spread.
Do you cover the filled jars with water ?
Great question Yvonne. Yes be sure to have at least one to two inches of water over the top of the jars to get a good seal.
I did it!!!! I actually heard the “pop” on each jar and got so excited with each one! We have a plum tree and they mostly get wasted…till now! Question: where should I store the ones I don’t give away? The fridge? Cabinet? Dumb question probably. First timers! 🤣
Great question Heather. The ones that didn’t pop should be used first. Yes store in the fridge or give as gifts right now. Who wouldn’t love a gift of fresh homemade plum jelly.
Can I use pint jars instead of the jelly jars? Would I have to change anything in the recipe?
Great question Judy. No you would not have to change a thing. Just pour the jelly in pint jars and let it sit. It should be fine. Good luck. Please share a picture and tag me. I would love to see the finished product.
i followed the directions to a T. It has been on my counter for a couple of hours and looks more like syrup consistency.Any ideas? can i boil the finished jars longer? Should i pour the jars into the pot and cook longer possibly with more pectin? A little frustrating after so much work
Thanks for your question Carol. I am so sorry this batch didn’t turn out for you. Are you at a higher altitude? You may not have boiled it long enough in the beginning. That is the key to the whole process. It took me several tries to get it right. You may just have syrup, and that is good too. As long as the jars are sealed you can still use them. -Amy
I have my plums and jars and am ready to go! But, is the pectin in the recipe powder or liquid? I have liquid in the house and prefer it, but didn’t know if I should buy the powdered to make this work. Will liquid pectin work? Thanks!
Great question. Both should work just fine. I have always used the powder, but have heard of others using the liquid with great success.